


Key Takeaways
- Replacing a dishwasher pump is a feasible DIY project with proper preparation.
- Ensure safety by disconnecting power and water supplies before starting.
- Consult your dishwasher’s manual for model-specific instructions.
Introduction
Dishwashers have become an indispensable part of modern kitchens, but when dishes come out dirty or the unit fails to drain, a faulty pump is often the problem. Tackling this issue on your own may sound overwhelming, but with clear instructions and reliable tools, replacing the pump yourself is completely achievable. A crucial first step is getting a new part that matches your dishwasher model, ensuring a smooth installation and optimal performance.
Most dishwashers share a similar layout, so understanding the process of removing and replacing a pump will not only save money but also give you the satisfaction of a job well done. By preparing properly and following the manufacturer’s instructions, you can avoid unnecessary costs while restoring your appliance’s function.
This guide will walk you through the essential tools you need, critical safety precautions, and a detailed series of steps to replace a dishwasher pump successfully. Whether you’re an experienced DIYer or undertaking an appliance repair for the first time, this approach will help clarify the process and make each stage manageable. For additional guidance, reference reputable sites such as Family Handyman’s dishwasher repair advice to supplement your understanding.
It is always wise to have your dishwasher’s model-specific manual on hand. Reading through the manufacturer’s instructions for your exact unit can clarify any model-specific requirements and help avoid mishaps as you work through each step.
Tools and Materials Needed
- New dishwasher pump compatible with your model
- Screwdrivers (Phillips and flat-head)
- Adjustable wrench
- Pliers
- Towels or a shallow pan (to catch water)
- Work gloves
Step 1: Safety First
Ensure that you address safety from the very beginning of this project. The dishwasher operates with both electrical power and water—two hazards that require careful handling. Start by turning off the power supply to your dishwasher at the circuit breaker. Double-check that no electricity is flowing to the appliance before proceeding. Next, turn off the dishwasher’s water supply, typically located under the kitchen sink. Taking these precautions will prevent accidental shocks, electrical fires, or water leaks as you proceed with the repair.
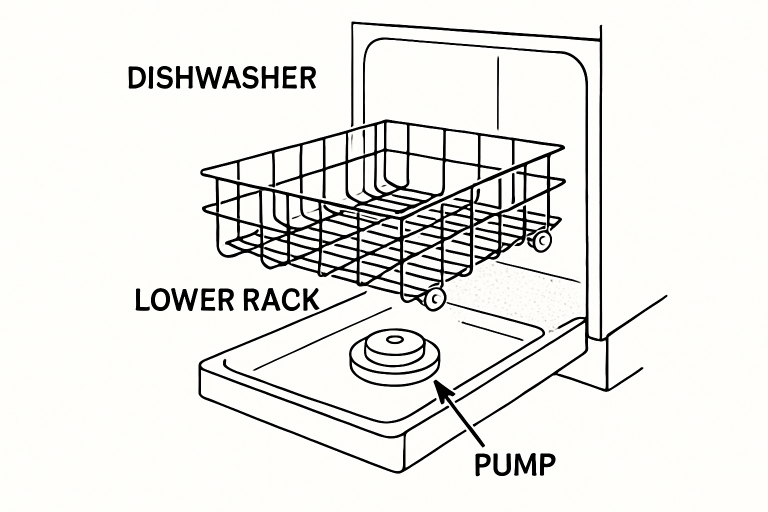
Step 2: Access the Dishwasher’s Interior
Open your dishwasher’s door fully and slide the lower dish rack out to create ample working space. Removing obstructions from the bottom area of the dishwasher allows you to clearly see the pump assembly and access it easily when you move to the next steps. Work with care, as even a minor bump can dislodge internal components or secondary attachments.
Step 3: Remove the Lower Spray Arm
The lower spray arm enables water flow to clean your dishes, but it also covers the pump in most models. Locate the central bolt or clip that secures this spray arm. Using your screwdriver or a pair of pliers, carefully remove the fastener. Lift the spray arm out and set it aside. This step is crucial, as it allows you to access the pump cover directly beneath the arm.
Step 4: Detach the Pump Cover
Locate the fasteners or clips holding the pump cover in place. These screws or clips are generally visible once the spray arm is removed. With a screwdriver, loosen and remove each one, keeping them somewhere safe for reassembly later. Gently lift off the cover to fully expose the pump assembly below.
Step 5: Disconnect the Faulty Pump
Identify the dishwasher pump, typically situated at the lowest point in the base. Begin disconnecting any wires fastened to the pump’s electrical connector. Wearing gloves, use pliers to unfasten and gently pull off any hose clamps, keeping water lines in place. With the hoses disconnected, remove any screws or mounting clips securing the pump in its housing. Carefully pull the faulty pump from its location, noting how it is fitted for easier installation of the new unit.
Troubleshooting Tip
If you hit resistance or notice lingering water, lay out towels or position a shallow pan underneath to absorb spillage. At this stage, ensure you do not tug harshly on wires or hoses, as this may create secondary repairs that complicate the job.
Step 6: Install the New Pump
Fit the new dishwasher pump in place, lining up the mounting points as with the original pump. Reinsert the fastener screws or clips to secure it. Attach the hoses, tightening the clamps with pliers for a leak-proof fit. Finally, reconnect the electrical connectors, ensuring each is firmly seated and correctly aligned. Proper installation reduces the risk of future malfunctions and extends the lifespan of your dishwasher.
Step 7: Reassemble the Dishwasher
- Replace the pump cover with the screws or clips you previously removed.
- Set the lower spray arm back over the cover, securing it in place with its central bolt or clip.
- Slide the lower dish rack back in, making sure it glides smoothly into its tracks.
Step 8: Test the Dishwasher
Once everything is reassembled, restore power at the circuit breaker and turn the water supply back on. Run a short wash cycle with the dishwasher empty, closely monitoring for leaks or error signals from the appliance. Listen for consistent pump sounds, and check that water is draining as intended.
For ongoing maintenance and troubleshooting tips, you can consult the Consumer Reports guide to dishwasher care, which offers further advice on keeping your appliance running smoothly.
By following these methodical steps, you can confidently replace your dishwasher pump and extend your appliance’s service life. Remember to reference your owner’s manual for any specific instructions, and consult a professional technician if you encounter complications beyond DIY solutions.


